The Olympus OM-D – A Street Review

Trafalgar Square, London
I was one of the lucky few to receive their pre-ordered Olympus OM-D camera body in the first half of May; mine came through from Precision Camera, my first class local store. This was just three weeks before heading to Europe for a 23 day (really!), three country, vacation with all of the opportunities that would provide for making photographs. Camera in hand, it quickly became clear to me that I would never again use or upgrade my Nikon D300 SLR equipment. I won’t argue that a contemporary full-frame Nikon D800 wouldn’t beat the crap out of the Olympus for image quality and high ISO applications, but I didn’t have a full frame system and, smaller than my old Leica M6, the OM-D could do everything I wanted in less than half the weight and volume of the equivalent 35mm SLR system. So I gave the D300 and three Nikon zooms away to a somewhat stunned, but very happy, young seminary student just starting out in photography.
[NOTE: The correct designation for the camera is “Olympus OM-D E-M5” and perhaps one day, when there are other models in the OM-D system, it will make sense to refer to this machine as the E-M5 but that rolls of the tongue like the name of some bird flu virus so I shall stick with the more pleasant and nostalgic OM-D identification for the purposes of this review.]
Vacation over and 3,000 exposures later, do I regret that decision? Heck no! Using the OM-D has been the most satisfying new camera experience that I have had in over 35 years and 10 different bodies. I wrote much the same about the Panasonic GF1 two years back, and that was certainly my entry drug into the Micro Four Thirds concept, but the GF1 was never intended to be my primary camera so I forgave its limitations; with the OM-D there is very little to forgive. In case this seems too glowing I must say that I am no Olympus fan boy; I came to the OM-D with some trepidation after multiple bad experiences with Olympus in the past. I was sadly dissapointed with my 1984 OM-4 purchase – the spot meter option made it my dream camera at the time but it failed to deliver (spot readings from a gray card varied by a stop from an average reading of the same card, the viewfinder was dull, the lenses gravelly to turn). So what makes the OM-D a winner?
Electronic Viewfinder
I was nervous about having an electronic viewfinder on my primary camera. The EVF of my Panasonic GF-1 is barely adequate for framing and useless for focussing or image assessment, how would the OM-D stack up? At 1.44 megapixels, the OM-D finder is much lower in resolution than the Sony NEX-7’s 2.4 megapixels: is 1.44 megapixels enough? Yes it is, and after three weeks of daily shooting with Olympus EVF I will never go back to an optical finder.
Using an EVF feels a bit like cheating, much as using autofocus did back in the late 80’s. Obviously the image you get does not match the quality of the final Lightroom results but, set to black and white display with immediate feedback of exposure adjustments, it may be as close as technology will take you towards an instant Cartier-Bresson derivative kit. Hopefully you won’t use it just to make derivative images but seeing the chiaroscuro impact of your settings before you click the shutter is a wonderful boon. And it is certainly much harder to walk around with +3 stops on your exposure override and not quickly realize your mistake.
Function Buttons & Custom Configuration
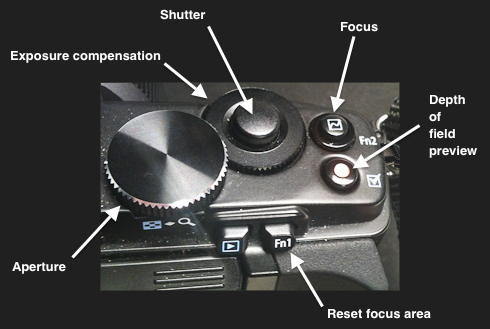
The OM-D offers four slots for recording groups of custom settings covering everything from exposure controls, viewfinder displays, and sounds to button configuration. After a little experimentation I settled on the button assignments illustrated below, at least for the aperture priority street photography that I concentrated on while in Europe. Like many, I prefer to separate autofocus from the shutter button. I found that the Fn2 button, right beside to the shutter release, was the instinctive position for triggering autofocus. I could have configured the Fn1 button for this, on the back of the camera, which would have more closely matched the Nikon location that I have used for more than 20 years but my large thumb did not rest there naturally and it was too easy to fat finger the image review button by mistake. I quickly came to prefer the top plate location for autofocus despite my long Nikon experience.
 Thank the stars that Olympus allowed the red dot video button to be overridden. I shoot video perhaps once a year; I don’t want to waste a well placed function button on that and I certainly don’t want to find that I have accidentally been recording a movie for the last 20 seconds. The video button turns out to be the perfect location for depth of field preview, just a little behind the Fn2 autofocus button.
The Fn1 button, on the back of the camera, is a little wasted in this configuration since changing the focus area away from center only / no face detection was something that I did only very occasionally. Perhaps having Fn1 revert to my most frequently used configuration set, which would include the focus area along with everything else, would be a better use? Time will tell as I cover a wider range of subjects.
Given the smaller size of the OM-D body compared to that of my old Nikon D300, the control layout is a good fit. The Olympus design relies much more on the index finger, with no function buttons on the front of the camera (where Nikon places depth of field preview and a custom button for use by second and third fingers). In practice though, I made little use of Nikon’s front face function button so I don’t miss it; and I like having shutter, focus and depth of field all together under the same finger. Mileage will vary for other users I am sure.
Dual Dial Controls
It took me a few days to get used to the position of the rear dial, my aperture control; initially it seemed further to the left than my searching thumb expected with the camera at my eye. But this was a trainable obstacle: it required significantly longer to adjust to than the my chosen location for the focus button and conscious effort was required for a couple of weeks before the muscle memory fully kicked in.
The front dial, on the other hand, was immediately comfortable for exposure compensation. I greatly prefer the Olympus dial associations to those of my older Nikons: on the OM-D, the front dial is always exposure compensation with the rear dial switching between aperture and shutter speed according to the A or S mode selection. On the Nikons the front wheel was always aperture and the rear wheel always shutter speed; a separate button had to be pressed in conjunction with a dial in order to change the exposure override. In M / manual mode, where exposure compensation is moot, the front dial of the Olympus does become the aperture control but if exposure compensation makes sense for the mode you are using then it will be set via the front dial.
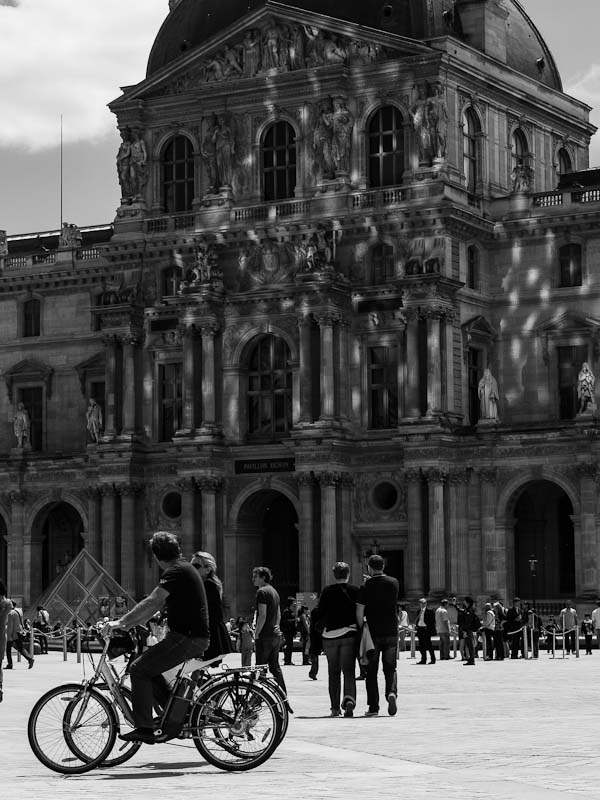
With the effects of the compensation immediately visible in the viewfinder, I found myself using it more often than I had with previous cameras. Seeing the sunlight reflecting from the glass pyramid entrance of the Louvre back onto the wing of the original building, it was easy to preview and manipulate the exposure to bring out the triangular pattern of highlights on the facade. Score two for the EVF and two more for the well located exposure compensation dial that did not require a selector button to be held down at the same time; Nikon gets a zero.

Pyramid, The Louvre, Paris
Image Stabilization
The OM-D’s in-body stabilization worked well under most conditions though my longest focal length was only 45mm (90mm full frame equivalent) so I was not really pushing its limits as a longer telephoto lens might. Working in aperture priority, favoring depth of field over shutter speed, my problems were always with people moving rather than the camera failing to compensate for my shaky hands. I have more than a few images with sharp contexts surrounding slightly blurred pedestrians: walking subjects need a faster shutter speed than my poor street skills typically allowed for.
Touch Screen
Now this was unexpected: I really like the touch screen! I had expected to disable it at the first opportunity but instead found it unobtrusive and useful. In operation it performs much as does an iPhone, with a light stroke or tap and no pressure. Reviewing images is a breeze with this capability, flicking through the images to the left or right. Tap to zoom in and push position the image, and there’s a slider to change magnification.
One frustration with image review and the touch screen: if your finger passes to close to the view finder, the eye level detection kicks in and turns off the rear screen in favor of the EVF. This happens way too often when you are trying to zoom in and check the focus of an image detail. Happily, there is nothing that depends on the touch screen – anything you can do with a tap or a swipe is also accessible through intuitive use of the cursor and OK buttons.
A second frustration is that some obvious things are not accessible through touch. Using the info summary display, you can select the feature you want to configure by touch but must press the OK button to activate it. That should be a double tap. And why can’t you choose the ISO, focus point, picture mode (viewfinder color preference), image quality or any other values by touch? Still, this limitation is much preferable to the opposite of only being able to make such changes through the touch screen: gloved hands on January morning in Wisconsin are much happier with buttons than capacitance detection touch screens.
ISO & Noise
Clearly, the OM-D cannot compete with a 2012 era full frame SLR but I found that the noise “grain” was acceptable for street photography even when shooting at ISO 1600 in the Paris Metro. The Panasonic GF1 is at the edge of its envelope at ISO 400, the OM-D delivers equal or better results at ISO 1600. Most of the time I left the ISO setting on Auto with an upper limit of 1600. Evening dusk images of Parisian cafe patrons at ISO 1000 are not noise free but compare very well to, better than, traditional film results of the same subjects.
The ISO value selected by the camera in Auto mode is visible in the viewfinder so, with that feedback, it is a simple matter to the widen the aperture or drop the shutter speed if you want less noise and have the light to avoid it.

Olympia and Admirers, Musée d’Orsay, Paris
Lenses and Depth of Field
Speaking about lenses might be outside the scope of a typical camera review but it goes to my motives in choosing Micro Four Thirds over 35mm full frame format, an option I had given serious thought too before ordering the OM-D body.
I took three lenses with me to Europe, my entire Micro Four Thirds collection at this point: the Panasonic 20mm f1.8 prime, the Olympus 45mm f1.8 prime, and the Panasonic 7-14mm f4 zoom. I made little use of the zoom on this trip but I expect it to be the foundation of suite of zooms covering wide, mid range and telephoto lengths for landscape work. The whole outfit traveled in a twelve year old REI fanny pack (a “bum bag” for the offended British reader). This in turn was carried inside my laptop backpack when flying, allowing me to take my clothes in a second carry-on and not check any bags; plus three for Micro Four Thirds, another zero for SLRs.
Depth of field is a major difference between Micro Four Thirds and 35mm full frame: at F8, a 25mm standard lens on a Micro Four Thirds camera has roughly the same depth of field as a 50mm standard at F16 on a full frame 35mm camera – that suits my purposes very well. I am not a portrait photographer, I generally do not want to isolate my subject from its context. For both landscape and street photography, I typically want the maximum depth of field possible: ideally, the image would be in focus from front to back. The smaller sensors of Micro Four Thirds cameras need only one quarter of the light required by a 35mm full frame sensor to afford the same depth of field from a lens of equivalent magnification. Happily, on those few occasions that I really do want shallow focus, the Olympus 45mm f1.8 can open up and deliver.
Noise Levels
All the notification beeps and buzzes can be disabled; that really was the first thing I did along with turning off the low light focus assist light.
The shutter is not as quiet as my Leica M6 (an unfair comparison) but it is hardly noticeable in real world situations and far more discrete than the rolling thunder of an SLR.
The camera makes a continuous hushed whirring sound when switched on, noticeable only to the photographer holding the camera up to his face. This is the sensor “floating” as it does even when the shutter is not pressed. Image stabilization is only activated when the shutter is half pressed but the sensor mechanics are powered up and ready to go active when called upon.
Black or Silver?
Like many others, I was initially seduced by the marketing images of the silver body, preferring the leatherette styling of the torso to the more obviously plastic diagonal pattern of the all black variant. Seduced is the word, for who would choose a silver body for discrete street photography? Nevertheless, that is what I ordered.
Reading that the silver bodies were likely to be over subscribed and the last to be delivered, I dropped in to Precision Camera back in April to find out what they knew and whether I would be better switching to black to have a chance of delivery before I left on vacation. By sheer dumb luck, the Olympus rep was demonstrating the cameras in store that day. I got to examine and handle both models – the marketing photos had greatly exaggerated the size and finish. In the hand, the black looked just as good as the silver. And the word was that silver, body only, would be the last to arrive and probably not before I left the country. Precision Camera allowed me to put a second deposit down on a black body, committing that I could cancel whichever order did not arrive and apply both deposits to purchase the first one that showed up.
Having had the black body for six or seven weeks I would not now order the silver. I do wish the 45mm lens had been available in black but, even with that mounted, the combination does not look as serious or threatening as the SLRs being waved around by everyone else. The black OM-D is indeed a discrete street tool.
Problems
The Olympus OM-D story is not a complete Disney fairy tale; there are a couple of warts on this Prince Charming.
Most significant, though not disastrous, the camera sometimes locks up completely. Other users have reported the same problem though I cannot be sure that the cause is the same; I never figured out what the sequence of events was though, for me, it was always seemed to be after the camera had been idle for several minutes. This happened three or four times during the trip; happily it is fixed simply by popping out the battery and putting it back in. If I were a professional photographer, a journalist say, the lost shots could have been more significant. I imagine that there will be a firmware fix available soon.
Spare batteries: there are none to be had. I always buy a second battery when I get a new camera but Olympus has yet to deliver any to its vendors some two months after the camera shipped. Fortunately the one battery sufficed. On my heaviest day I made nearly over 360 exposures and the charge indicator still showed “full”. Some reports suggest that the battery indicator can go from full to flat very quickly and I was always conscious that I could get caught out, topping the battery up more often than I might have done otherwise.
Flash shoe cover: lost. I noticed this was loose one time and pushed it back on. Next time I looked, it was gone :-( It’s a standard fit so I should be able to get a replacement if I can be bothered to look; still, I would have preferred not to lose it inside two weeks of active use.


